Followers

Sunday, 21 July 2013

Napravite sami papir za cestitku ( pucketava folija) - tutorijal/ Make your own paper for cards ( bubble wrap) / tutorial

Zdravo!
 Dugujem svima jedno izvinjenje sto tutorijal nisam postavila juce, kao sto sam obecala, ali bila sam zauzeta u toku dana, gosti, a onda umorna i pospana uvece. Danas sam ceo dan imala migrenu, uf...

 Hello!

  I owe everyone an apology for not posting the tutorial yesterday, as promised, but I was busy during the day, guests, and then tired and sleepy at night. Today I had a migraine all day, uh ...


Da krenemo sa tutorijalom. :)
(Inace originalna ideja potice odavde .)
Evo kako izgleda jedan od papira.
 
Let's start with the tutorial. :)
(By the way the original idea comes from
here .)
Here is the one of the papers.


U principu u pitanju je pecatiranje, dakle treba vam mastilo, ali vam ne treba pecat.
 in general it is a stamping, so you need ink, but you do not need a stamp.


Sta vam sve treba:
Poklopac od CD ( ja sam ovaj vec koristila za nesto drugo, tako da je na njemu zalepljeno malo obostrano lepljive trake), zatim makaze, obostrano lepljiva traka i  pucketava folija ( ili vec kako se zove na srpskom), prikazano na slici ispod. 

What you all need:

The cover of the CD (I've used this for something else, so it's stuck on it a little double-sided adhesive tape), then scissors, double-sided sticky tape and bubble wrap, as shown in the picture below .


Prvo sto treba da uradite je da zalepite obostrano lepljivu traku na poklopac od CD-a kao na slici ispod.
The first thing to do is to stick the double sided tape on the cover of the CD as shown below.


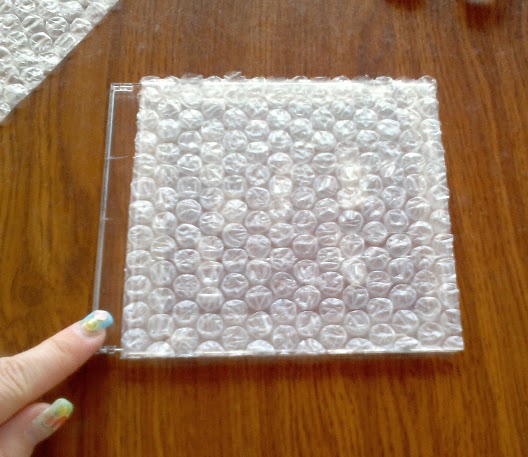
 Odlepite papir sa trake i zalepite pucketavu foliju na poklopac od CD-a.
 Peel off the paper from the tape and stick the bubble wrap on the cover of the CD.


Visak isecite, da dobijete kvadrat, kao na slici ispod. Deo poklopca koji je ostao prazan ce vam biti od pomoci prilikom pecatiranja, da ne zamazete prste.

 Cut off the the surplus, to get a square, as shown below. Part of the cover which was left empty will help you out when stamping, not to smear your fingers.

Mozete koristiti bilo kakvo mastilo, ja sam za ovaj tutorijal koristila Tim Holtz  Distress mastilo "Festive Berries" i  tri mala Color Box mastila i naravno, papir. mozete koristiti i papir u boji, ja sam za ovaj tutorijal koristila beli hamer papir.

 You can use any ink, I used for this tutorial Tim Holtz Distress Ink "Festive Berries" and three small Color Box inks and of course, paper. You can also use colored paper, I used for this tutorial white thick paper.


Dakle, natapkamo mastilo na pripremljeni poklopac od CD-a
So, we sponge ink on a prepared cover of a CD


I spustimo na papir.
And we stamp on paper.


Lepo ispritiskamo odozgo po poklopcu, jednom rukom, dok drugom drzimo poklopac na mestu.
We press nicely over the top side of the CD cover with one hand while with the other hand we firmly hold the CD cover on the place.


Podignemo poklopac i dobijemo nesto ovako ( slika ispod).  Izrezete papir trimerom ili makazama.
 Lift up the CD cover and you'll get something like this (picture below). Cut the paper with trimmer or scissors.


Ja sam od ovakvog papira napravila ovu cestitku:
I used a paper like this to make this card:


A sad cu da vam pokazem jos nesto sto sam pokusala da uradim, na isti nacin, pa opet malo drugacije. Ocistila sam mokrom maramicom, pa zatim suvom,  pucketavu foliju i uzela tri mala Color Box mastila: zeleno, plavo i zuto. Htel sam da pokusam da dobijem papir na kom cu imati travu, nebo i Sunce.
  
And now I'm going to show you something I've tried to do, in the same way, and again, a little differently. I cleaned with a wet towel and then a dry one, the bubble wrap and took three small Color Box inks: green, blue and yellow. I wanted to try to get a paper that has grass, sky and Sun.


Krenula sam prvo sa zelenom, natapkala sam poklopac od CD-a, ali samo polovinu
 I started first with the green, sponged the CD cover, but only a half of it


Zatim sa plavom. Pri tom sam isekla mali kruzic od papira i stavila ga na mesto na kom sam htela da bude Sunce. Natapkala sam mastilo, ne podizuci papir.

 Then the blue. I cut the little circle of paper and put it in a place where I wanted th Sun to be. I sponged ink, without raising up th circle of the paper.


Zatim sam podigla papir i oko kruga stavila papir koji je preostao od kruzica koji sam isekla i samo par puta pritisla zuto mastilo na krug ( slika ispod). 

 Then I picked up the paper and put on that place the paper that was left when I cut out the circle and only a   few times pressed the yellow ink on the circle (see the photo bellow below).


I dobila sam nesto ovako:
And I got something like this:


Postupak isiti stavimo na papir, dobro ispritiskamo lepo i ravnomerno, pazljivo podignemo poklopac.
The proccess is the same, we put CD cover on the paper, press it nicely and evenly and carefully lift it up.


I...dobijemo ovo ( slika ispod)
(Ne mogu da kazem da sam posebno zadovoljna postignutim rezultatom ovog puta, bilo bi bolje da je zeleno, pa cak i plavo masilo tamnije, ali ovo je bio samo prvi pokusaj i ideja za nesto sto, naravno, moze mnogo bolje da se uradi) :)

And .. we get this (picture below)
(I can not say I'm particularly pleased with the result this time, it would be better if the green and even blue inks were darker, but this was only the first attempt and the idea of something, that could, of course, be done in a better way) :)


Nadam se da vam se svideo tutorijal. :)
I hope you liked the tutorial. :)


Evo jos jedne cestitke sa papirom napravljenim na isti nacin. Koristila sam Tim Holtz distress mastilo.
Here is another card I made using the paper made in the same way. I used a Tim Holtz distress ink. 


Hvala sto ste citali moj tutorijal! :) 
Thank you for readng my tutorial. :)


Friday, 19 July 2013

I konacno mladozenja... :) / And finally the groom... :)

Zdravo svima! 

Posle dve cestitke za vencanje sa motivom mlade u prvom planu, evo jedne sa mladozenjom. :) 

Hello everyone!

After two wedding cards with a bride motive as the focus, here's finally one with a groom. :)


 Pecat je Elphine House Australia. Motiv sam bojila Tim Holtz distress mastilom, na 300g akvarel papiru.Pecatirano StazOn-om.
Dodala sam tracicu, koju sam pricvrstila heftalicom, par dugmica, srce i to je sve. Papir sam sama napravila, ako vas zanima kako, tutorijal je uradjen, postavljam ga danas. :)

 The stamp is Elphine House Australia. I coloured the image using Tim Holtz Distress inks on a 300g watercolor paper. Stamped with StazOn ink pad.

I added a ribbon, which I attached with a stapler, couple of buttons, heart, and that's all. I made the backing  paper myself, if you are interested in knowing how I made it, the tutorial is done and it will be posted shortly.. :)


 I'm entering Elphine House Australia challenge - "Add some metal" ( Stamples on the ribbon)

 Ne zaboravite da svratite kasnije na moj blog ako ste zainteresovani za tutorijal. :)
Pozdrav!

 Do not forget to stop by later on my blog if you are interested in the tutorial. :)
Bye!

Novi clanovi u timu "Izazovi i slatkisi" ! :) / New DT members in the "Izazovi i slatkisi" team! :)

Zdravo svima! 

 Samo da vas obavestim da smo Jasna i ja dobile pojacanje u timu "Izazovi i slatkisi"! :) 

Jako mi je drago sto su Andreja i Katarina pristale da budu deo naseg tima!
Obe su izuzetno talentovane i prave prelepe cestitke! :)
Jedva cekam septembar kada zvanicno pocinjemo, a raduje me i to sto od septembra imamo i goste dizajnere ( ko nam se pridruzuje u septembru mozete videti ovde) i mnoge druge novine!

 Dodjite na nas blog i druzite se sa nama!!!

Hello everyone!

  Just to let you know that
Jasna and I got two new friends in "Izazovi i slatkisi" team ("Challenges and candies" team!" :)

I'm so delighted that  Andreja i Katarina accepted to join us as DT members!
Both are extremely tallented and make beautiful cards! :)
I can't wait for the september when they will officially start and I'm happy also because from september we will have guest designers, too ( who will be joining us in September you can see in this post ) and we will have many other newelties!

Come on our blog and join us!!!
 

Monday, 15 July 2013

Troublemaker...Jeste li za sladoled? / Ice cream anyone?

Zdravo svima! 
Evo jedne cestitke koju sam sinoc napravila. 
 Jeste li za sladoled?

Hello everyone!
Here is a card I made last night.
 Ice cream anyone?


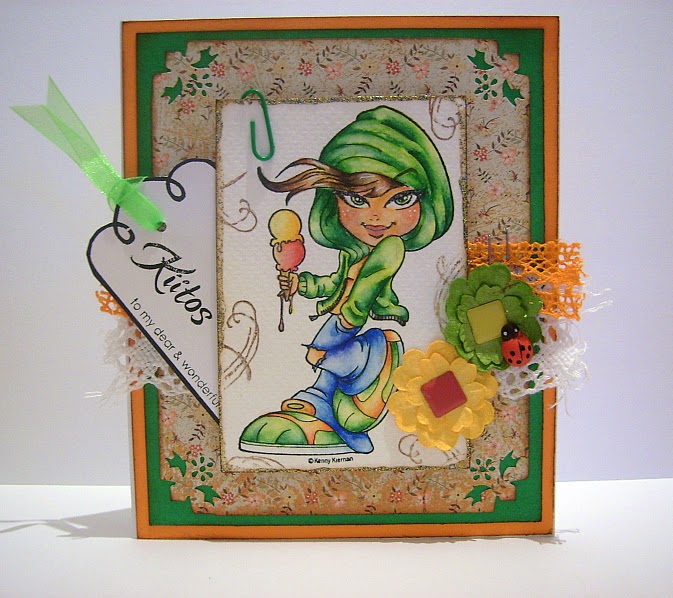
Pecat je Whimsy Stamps, papir je Memory Box, tag je takodje Whimsy Pecat, dok je "Kiitos" deo Stampendous seta. "Kiitos" inace znaci "hvala" na finskom. Cvetici su Petalloo, dodala sam cipku, bubamaricu... .
The stamp is Whimsy Stamps, the paper is Memory Box, tag is also Whimsy Stamps, while the "Kiitos" stamp is a part of  a Stampendous set and "Kiitos" mean "Thank you" in Finnish. The flowers are Petalloo, I added some lace, ladybug, brads...


Motiv je pecatiran StazOn mastilom na 300g akvarel papiru i bojen akvarel bojicama.
The image was stamped with StazOn ink pad on a 300g watercolour paper and coloured with watercolour pencils.

I'm entering: Whimsy Stamps challenge  - "Ribbon and lace"

Tutorijal o bojenju ovog motiva sledi. :)
Prijatnu sedmicu vam zelim!
Tutorial about colouring this image will follow shortly. :)
Have a great week!


Sunday, 7 July 2013

Kolacici...i poklon/Cookies...and a gift

Zdravo svima! 

Vreme je za novi izazov na blogu  "Izazovi i slatkisi"!
Ovog puta tema je "Kolacici"! U obzir dolazi sve vezano za hranu.

Hello everyone!

It's time for a new challenge on the
"Izazovi i slatkisi blog"!
This time the theme is "Cookies!" It can be anything related to food.


Evo moje cestitke:
Here's my card::

Ja sam za ovaj izazov koristila pecat "Whiff of Joy"-Willow with cookies, inace jedan od meni omiljneih pecata.
Bojila sam akvarel bojicama na 300g akvarel papiru..
Jedan papir je K&Co, za drugi nisam sigurna. Tekst je Whimsy Stamps. Dodala sam cajnik, cipkicu, par cvetica i dugmica.

For this challenge I used the "Whiff of Joy"-Willow with cookies stamp, one of my favourites. 
I coloured it with watercolor pencils on a 300g watercolor paper.
One of the papers is K&Co, I'm not sure about the other one. The sentiment is Whimsy Stamps. I added a teapot charm, some lace, a couple of flowers and buttons.


Izazov traje do 1. avgusta, tako da imate dovoljno vremena da se prijavite, a jednog od ucesnika ocekuje i nagradica.:)

The challenge is open until 1 August, so you have plenty of time to sign up, and one of the participants will receive a candy. :)

 I'm entering: 
Elisabeth Bell's World challenge - "A little Yummy for Your Tummy" 
EHA challenge - "Tic -Tac -Toe -" ( I used buttons, flowers and gems)

~ ~  ~

A pogledajte kakav divan poklon mi je stigao pre neki dan od  Bojane Iza Duge!
 And look what a wonderful gift I received the other day from Bojana Iza Duge!


Hvala Bojana!
Sve je prelepo! :)

  Thank you Bojana!
It's beautiful! :)


Tuesday, 2 July 2013

Pobednik junskog komentar slatkisa/ Winner of the June commenter's candy

Zdravo svima! 

Ako ste u toku juna ostavili komentar na bilo koji od mojih postova objavljenih u junu, ucestvovali ste u mom "komentar slatkisu".  :)

 Hello everyone!

If during June you left a comment on any of my posts published in June, you have participated in my "commenter's candy." :)


Jun je prosao i red je da objavim komentar koji je pobedio!
A pre toga da vam pokazem junski komentar slatkis! :)

 June has passed and it is time for the announcement of the winning comment!
And before that, I need to show you the June commenter's candy! :)


Sta imamo tu? Jedan gumeni Whiff of Joy pecat - "Shy Willow" , konac od kedelje, cvetna tracica i tri plasticne spajalice.

What do we have here? A Whiff of Joy rubber stamp - "Shy Willow" thread, floral ribbons and three plastic clips.

I ko je osvojio ovaj slatkis....
Odlucila sam se za post "Vrapcicu, vrapcicu..",
koji je nazalost prosao prilicno neopazeno, a smatram da je mozda i najlepsi objavljen u junu, jer se radilo, izmedju ostalog i o malenoj pticici koju su moj sestric i sestricina spasili. :)
Post je dobio jedan divan komentar, a ostavila ga je...

 And who won the candy ....
I've decided on the  post "
Little sparrow.."
which sadly went by quite unnoticed, and I think that is perhaps was the most beautiful post published in June, because it was, among other, about  a small birdie that was rescued by my nephew and niece. :) 
The post  received a wonderful comment,left by...
.
.
.

Zdravo Vanja, mislim da je i vrabac zaslužio komentar, drago mi je sto ste se potrudili da pomognete i ovoj mrvici. Mnogo volim životinje i volim da im pomažem, imam kod mene dva psa, mace, pre nekoliko meseci sam spasila i goluba, povredili su ga gavrani ali je uspeo da ozdravi. I hvala vam sto ste tom vrapčiću spasili život, verujem da i njemu to puno znači... Veliki pozdrav! 

Anice, ti si osvojila moj junski komentar slatkis!
Cestitam!
Posalji mi adresu na email, pa da ti sto pre posaljem nagradicu. :)

 Anice, you won my June commenter's candy!
Congrats!
Send me an e-mail, and you'll receive your candy soon. :)

I to nije sve, nastavljamo u istom stilu, komentarisite u toku jula, za sansu da osvojite julski slatkis! :)  

And that's not all, we continue in the same way, comment in July, for a chance to win the July candy! :)


Thursday, 27 June 2013

"Vintage mlada", distress mastila tutoriajal/Vintage Bride, distress inks tutorial

Zdravo svima! 
Napravila sam jos jednu cestitku za vencanje, a usput sam uradila i tutorijal bojenje "vintage" mlade. Koristila sam "distress" mastila. Nadam se da vam se dopada. :)


  Bojila sam na 300g akvarel papiru i koristila sledece boje : "Vintage photo", "Tattered rose", "Evergreen Bough" i "Festive berries".

Da krenemo ispocetka. 

Ispecatirala sam Elphine House pecat StazOn mastilom na 300g akvarel papiru.


Kao sto sam rekla koristila sam: "Vintage photo", "Tattered rose", "Evergreen Bough" i "Festive berries" Tim Holtz distress mastila.


Distress mastilo nije vodootporno i fantasticno je, izmedju ostalog i za bojenje motiva. S tim sto, za razliku od vodenih bojica, brze se "osusi", pa jednom naneta boja na odredjeno mesto na motivu, mora da se cetkicom i vodom "razvuce" u relativno kratkom roku, jer u protivnom stvaraju se "linije", veliki prelazi izmedju nijansi, koje ja u svom bojenju ne volim i uvek se trudim da izbegnem. U svakom slucaju brze je od bojenja akvarel/vodenim bojicama ( bar za mene).

Naravno, pored distress mastila bilo mi je potrebno jos i posuda za vodu, cetkica, maramica, na kojoj "skidam" visak boje i vode sa cetkice, i nesto na sta bih mogla da "natapkam" mastilo, ja sam koristila plasticni poklopac od CD-a


Sto se "natapkavanja"  mastila tice, mislim na ovo:

1.

2.

3.

4.

A sad krecemo sa bojenjem mlade...

Prvu boju koju koristimo, je najsvetlija "Tattered Rose".

  Ovu boju uvek koristim za lice i inace bojenje koze ( uz boju Vintage Photo), a u ovom slucaju naneta je blago i na vencanicu.


Dibicemo nesto ovako:


Zatim nastavljamo tamnijom bojom, "Vintage Photo":


Dodajemo boje na lice, vencanicu, ovu tamniju boju uglavnom stavljamo u uglove koji su i inace slabije "osvetljeni". Njom bojimo kosu, cipele, trake na cvecu i macku.


Sledeca boja je ""Festive berries".


Ovom bojom bojimo cvetove, ogrlicu na macki, obraze.


I na kraju koristimo "Evergreen Bough".


Bojimo buket i listice.


Trimerom za papir lepo isecemo motiv, a zatim mastilom "Vintage Photo" "natapkamo" npr. sundjercicem za sudove, ivice motiva, za dodatni "vintage" dodir. 


Ja isto uradim i sa papirom i sa hamer papirom. Inace "papir" koji sam ovde koristila sam sama napravila. O tome nekom drugom prilikom. :)


Nadam se da vam se svideo tutorijal. Odnedavno je paypal dostupan i kod nas, pa su nam i ova mastila samim tim dostupna, ako ih imate ili planirate da nabavite neke boje, mozda vam ovo bude od pomoci. :)


Wednesday, 26 June 2013

Vintage "mlada"/ Vintage bride

Zdravo svima! 
Da li vam prija ovaj malo hladniji talas ovih dana? Ja se ne zalim. :) 
Napravila sam jos jednu cestitku za vencanje, koristeci Elphine House Australia pecat. Mladu sam obojila tako da joj dam neku "Vintage" notu.

Hello everyone!
Do you like this a litle bit cooler weather these days? I don't complain. :)
I made another wedding card, using the Elphine house Australia stamp. I coloured the bride in a way to give her some "Vintage" tone.


  Pecatirala sam StazOn mastilom. Bojila sam na 300g akvarel papiru distress mastilom i koristila sledece boje : "Vintage photo", "Tattered rose", "Evergreen Bough" i "Festive berries".

I stamped with StazOn. I coloured the image on the 300g watercolour paper with distress inks, using next colours only:  "Vintage photo", "Tattered rose", "Evergreen Bough" and "Festive berries".

 
 Uskoro cu postaviti tutorijal o bojenju "Vintage" mlade.
I'll soon post a  tutorial about colouring a vintage bride. 

I'm entering Simon Says stamp - "Anything Goes"
Stump with Fun  - "Celebrate" 

Ne zaboravite za moj "Komentar slatkis"!
Don't forget about my "Commenter's candy"!

LinkWithin

Related Posts with Thumbnails