Hi!
I thought I would make a tutorial for the paper flowers I make. You can see what a flower looks like in the card in the photo bellow.
I made my DT card using some of the products available at Sunflowerfield

I have used Sunflowerfield Designs rubber stamp - Flower Pot designed by myself. :)


I coloured the image with watercolour pencils.
Ok,the tutorial - I will try to explain it step by step, but I think the photos show it well enough, too. It will be photos first and then a short explanation. :)

All you need for this flower is a piece of cardstock in any colour you wish, distress ink pad, I prefer Vintage Photo, a brad and a pen.

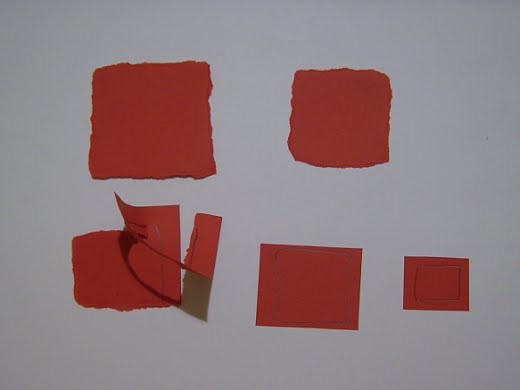
First step is to draw rectangles, yes rectangles, not circles. I always draw five of them, I start from the biggest one and go to the smallest, last one.

Next step is to tear the paper rectangles like in the photo, make sure you tear close to the line you drew.

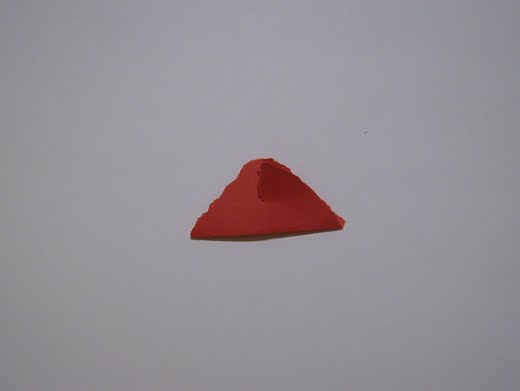
Now you take each rectangle, one by one and fold it in the middle like in the photo, to get a triangle and after you've done that, you just tear it from the top, but just a little, not to the bottom line.

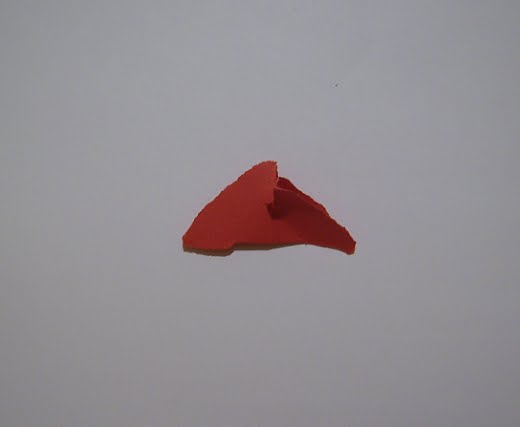
Then you unfold it and fold it again using two other corners of the rectangle tearing them in the same way. You repeat that with every rectangle.

When you're done with that, this is what you should get.

Now just crumple all five rectangles like in the photo.

Uncrumple them and use your distress ink pad to distress all of them. Make sure you distress well all the edges and you can distress the surface, too.

And this is what you should get (the photo above)

Now crumple all the rectangles again and uncrumple them. You can repeat it for the third time, too.

Put rectangles one over the other, starting with the biggest one, the smallest one should be on top. Just make sure that torn parts of one rectangle don’t go over the torn parts of the other rectangle.

Put a brad in the centre of the rectangles.

Now it's time to make a pretty flower out of the thing you got.
I must say that I always attach flower to my card first and then start arranging it, it's much easier that way.
First, crumple it a little, move some of the parts of the flower forward so it doesn't look flat and then start rolling the torn edges like in the photo. It really doesn't matter if you roll one side on the inside and another one on the outside, for me it looks prettier when it's kind of messy.

And this is what you should get at the end!
I hope you liked my tutorial, let me know what you think and also if you have some questions, suggestions or corrections, don't hesitate to speak. :)
Thank you for reading this tutorial and have a great day!
I thought I would make a tutorial for the paper flowers I make. You can see what a flower looks like in the card in the photo bellow.
I made my DT card using some of the products available at Sunflowerfield
I have used Sunflowerfield Designs rubber stamp - Flower Pot designed by myself. :)
I coloured the image with watercolour pencils.
Ok,the tutorial - I will try to explain it step by step, but I think the photos show it well enough, too. It will be photos first and then a short explanation. :)

All you need for this flower is a piece of cardstock in any colour you wish, distress ink pad, I prefer Vintage Photo, a brad and a pen.

First step is to draw rectangles, yes rectangles, not circles. I always draw five of them, I start from the biggest one and go to the smallest, last one.
Next step is to tear the paper rectangles like in the photo, make sure you tear close to the line you drew.
Now you take each rectangle, one by one and fold it in the middle like in the photo, to get a triangle and after you've done that, you just tear it from the top, but just a little, not to the bottom line.
Then you unfold it and fold it again using two other corners of the rectangle tearing them in the same way. You repeat that with every rectangle.

When you're done with that, this is what you should get.

Now just crumple all five rectangles like in the photo.

Uncrumple them and use your distress ink pad to distress all of them. Make sure you distress well all the edges and you can distress the surface, too.

And this is what you should get (the photo above)

Now crumple all the rectangles again and uncrumple them. You can repeat it for the third time, too.

Put rectangles one over the other, starting with the biggest one, the smallest one should be on top. Just make sure that torn parts of one rectangle don’t go over the torn parts of the other rectangle.

Put a brad in the centre of the rectangles.

Now it's time to make a pretty flower out of the thing you got.
I must say that I always attach flower to my card first and then start arranging it, it's much easier that way.
First, crumple it a little, move some of the parts of the flower forward so it doesn't look flat and then start rolling the torn edges like in the photo. It really doesn't matter if you roll one side on the inside and another one on the outside, for me it looks prettier when it's kind of messy.
And this is what you should get at the end!
I hope you liked my tutorial, let me know what you think and also if you have some questions, suggestions or corrections, don't hesitate to speak. :)
Thank you for reading this tutorial and have a great day!
Awesome tutorial Vanja, love the flower you've created. Don't know that I'd have that much patience, but it does look very effective. Love your card too.
ReplyDeletehugs
Donna xx
Super tutorial! Hvala ti! Poz. Moni
ReplyDeletehi dear,fantastic tutorial ,thank,s for sharing...laura
ReplyDeleteBeautiful flower!!!!!!!! Te quedó preciosa esta flor y el tutorial es muy simple... ya me están dando ganas de hacerla, acá en Argentina no hay material. Algunas chicas de Buenos Aires venden papeles que traen de EEUU, pude conseguir la máquina big shot y algunos dies, y así he hecho mis flores para mi mini álbum. Voy a intentar con tu idea. Gracias!!!! un beso Adriana
ReplyDeleteThank you so much for sharing this great tutorial, nicely done, Pretty flower.
ReplyDelete