Zdravo!
Dugujem svima jedno izvinjenje sto tutorijal nisam postavila juce, kao sto sam obecala, ali bila sam zauzeta u toku dana, gosti, a onda umorna i pospana uvece. Danas sam ceo dan imala migrenu, uf...
Hello!
I owe everyone an apology for not posting the tutorial yesterday, as promised, but I was busy during the day, guests, and then tired and sleepy at night. Today I had a migraine all day, uh ...
Da krenemo sa tutorijalom. :)
(Inace originalna ideja potice odavde .)
Evo kako izgleda jedan od papira.
Let's start with the tutorial. :)
(By the way the original idea comes from here .)
Here is the one of the papers.
Let's start with the tutorial. :)
(By the way the original idea comes from here .)
Here is the one of the papers.

U principu u pitanju je pecatiranje, dakle treba vam mastilo, ali vam ne treba pecat.
in general it is a stamping, so you need ink, but you do not need a stamp.
in general it is a stamping, so you need ink, but you do not need a stamp.

Sta vam sve treba:
Poklopac od CD ( ja sam ovaj vec koristila za nesto drugo, tako da je na njemu zalepljeno malo obostrano lepljive trake), zatim makaze, obostrano lepljiva traka i pucketava folija ( ili vec kako se zove na srpskom), prikazano na slici ispod.
What you all need:
The cover of the CD (I've used this for something else, so it's stuck on it a little double-sided adhesive tape), then scissors, double-sided sticky tape and bubble wrap, as shown in the picture below .
What you all need:
The cover of the CD (I've used this for something else, so it's stuck on it a little double-sided adhesive tape), then scissors, double-sided sticky tape and bubble wrap, as shown in the picture below .


Prvo sto treba da uradite je da zalepite obostrano lepljivu traku na poklopac od CD-a kao na slici ispod.
The first thing to do is to stick the double sided tape on the cover of the CD as shown below.

Odlepite papir sa trake i zalepite pucketavu foliju na poklopac od CD-a.
Peel off the paper from the tape and stick the bubble wrap on the cover of the CD.
Peel off the paper from the tape and stick the bubble wrap on the cover of the CD.

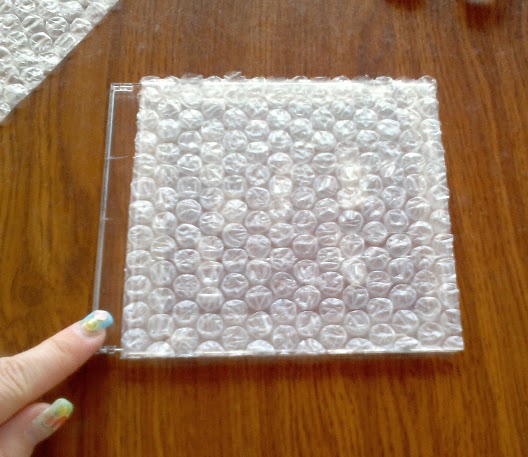
Visak isecite, da dobijete kvadrat, kao na slici ispod. Deo poklopca koji je ostao prazan ce vam biti od pomoci prilikom pecatiranja, da ne zamazete prste.
Cut off the the surplus, to get a square, as shown below. Part of the cover which was left empty will help you out when stamping, not to smear your fingers.
Cut off the the surplus, to get a square, as shown below. Part of the cover which was left empty will help you out when stamping, not to smear your fingers.
Mozete koristiti bilo kakvo mastilo, ja sam za ovaj tutorijal koristila Tim Holtz Distress mastilo "Festive Berries" i tri mala Color Box mastila i naravno, papir. mozete koristiti i papir u boji, ja sam za ovaj tutorijal koristila beli hamer papir.
You can use any ink, I used for this tutorial Tim Holtz Distress Ink "Festive Berries" and three small Color Box inks and of course, paper. You can also use colored paper, I used for this tutorial white thick paper.

Dakle, natapkamo mastilo na pripremljeni poklopac od CD-a
So, we sponge ink on a prepared cover of a CD

I spustimo na papir.
And we stamp on paper.
And we stamp on paper.


Lepo ispritiskamo odozgo po poklopcu, jednom rukom, dok drugom drzimo poklopac na mestu.
We press nicely over the top side of the CD cover with one hand while with the other hand we firmly hold the CD cover on the place.

Podignemo poklopac i dobijemo nesto ovako ( slika ispod). Izrezete papir trimerom ili makazama.
Lift up the CD cover and you'll get something like this (picture below). Cut the paper with trimmer or scissors.
Lift up the CD cover and you'll get something like this (picture below). Cut the paper with trimmer or scissors.

Ja sam od ovakvog papira napravila ovu cestitku:
I used a paper like this to make this card:
I used a paper like this to make this card:

A sad cu da vam pokazem jos nesto sto sam pokusala da uradim, na isti nacin, pa opet malo drugacije. Ocistila sam mokrom maramicom, pa zatim suvom, pucketavu foliju i uzela tri mala Color Box mastila: zeleno, plavo i zuto. Htel sam da pokusam da dobijem papir na kom cu imati travu, nebo i Sunce.
And now I'm going to show you something I've tried to do, in the same way, and again, a little differently. I cleaned with a wet towel and then a dry one, the bubble wrap and took three small Color Box inks: green, blue and yellow. I wanted to try to get a paper that has grass, sky and Sun.
And now I'm going to show you something I've tried to do, in the same way, and again, a little differently. I cleaned with a wet towel and then a dry one, the bubble wrap and took three small Color Box inks: green, blue and yellow. I wanted to try to get a paper that has grass, sky and Sun.

Krenula sam prvo sa zelenom, natapkala sam poklopac od CD-a, ali samo polovinu
I started first with the green, sponged the CD cover, but only a half of it
I started first with the green, sponged the CD cover, but only a half of it

Zatim sa plavom. Pri tom sam isekla mali kruzic od papira i stavila ga na mesto na kom sam htela da bude Sunce. Natapkala sam mastilo, ne podizuci papir.
Then the blue. I cut the little circle of paper and put it in a place where I wanted th Sun to be. I sponged ink, without raising up th circle of the paper.
Then the blue. I cut the little circle of paper and put it in a place where I wanted th Sun to be. I sponged ink, without raising up th circle of the paper.

Zatim sam podigla papir i oko kruga stavila papir koji je preostao od kruzica koji sam isekla i samo par puta pritisla zuto mastilo na krug ( slika ispod).
Then I picked up the paper and put on that place the paper that was left when I cut out the circle and only a few times pressed the yellow ink on the circle (see the photo bellow below).
Then I picked up the paper and put on that place the paper that was left when I cut out the circle and only a few times pressed the yellow ink on the circle (see the photo bellow below).

I dobila sam nesto ovako:
And I got something like this:
And I got something like this:

Postupak isiti stavimo na papir, dobro ispritiskamo lepo i ravnomerno, pazljivo podignemo poklopac.
The proccess is the same, we put CD cover on the paper, press it nicely and evenly and carefully lift it up.

I...dobijemo ovo ( slika ispod)
(Ne mogu da kazem da sam posebno zadovoljna postignutim rezultatom ovog puta, bilo bi bolje da je zeleno, pa cak i plavo masilo tamnije, ali ovo je bio samo prvi pokusaj i ideja za nesto sto, naravno, moze mnogo bolje da se uradi) :)
And .. we get this (picture below)
(I can not say I'm particularly pleased with the result this time, it would be better if the green and even blue inks were darker, but this was only the first attempt and the idea of something, that could, of course, be done in a better way) :)

Nadam se da vam se svideo tutorijal. :)
I hope you liked the tutorial. :)
I hope you liked the tutorial. :)

Evo jos jedne cestitke sa papirom napravljenim na isti nacin. Koristila sam Tim Holtz distress mastilo.
Here is another card I made using the paper made in the same way. I used a Tim Holtz distress ink.

Hvala sto ste citali moj tutorijal! :)
Thank you for readng my tutorial. :)

Ćao Vanja,
ReplyDeletesuper je ova ideja da se iskoriste kako ih ja zovem pucketave kese. Mislim da ih od sada više neću bacati :-))))
Pozdrav
Hvala na tutorijalu, mislila sam da je u pitanju napravljen pečat pa se njim ukrašava papir, super je ideja. Ne znam da li bi mogle da se koriste tempere ili možda neke druge boje za sličan efekat. Neverovatno je da toliko prosta stvar može da se iskoristi za nešto tako korisno i lepo :-)
ReplyDeletePozdrav
Super ideja. Vrlo je ljepo ispalo.
ReplyDeleteLp,K.
Hvala za tutorijal.
ReplyDeleteVeoma je lep efekat, a čestitke su savršene.
:-) Kako dobra fora, vrlo jednostavno kad ti neko pokaže kako, hvala ti na tome.
ReplyDeleteČestitke ne treba komentarisati, zna se. :-)
Pozdrav